There are a lot of different tutorials available for contouring, but most of them only cover how to contour for the most popular face shape: oval. Different face shapes have different ways of contouring to accentuate their features. Find out how to contour for you're face shape below!
What is contouring?
According to the dictionary contouring is molding something into a specific shape, typically one designed to fit into something else. In the makeup world contouring is when you use different shades of makeup to bring out the facial features or to hide certain sections and make it look like the "ideal" face shape, oval.
When contouring you can use products such as cream bronzers and dark blushes to shade and hide sections of the face. By using shimmery highlighters whether they be liquid, cream or powder, you will accentuate the area and make it stand out more. Many makeup artists choose to use cream bronzers and highlighters before foundation to create a more natural look, they then apply powdered contour products to finish off the face after foundation and powder application.
There are many contouring products available on the market, but to contour properly you also need the right tools. To apply cream products, sponges and brushes are very popular. To apply powder products brushes are the tools you need.
Just remember that there is nothing wrong with any of these face shapes, this is only a guide on how to contour your face to make it look more ideal according to the society's views. Everyone is different and unique, and you should be proud of who you are.
The oval face shape is considered the perfect and ideal face shape.
Our aim is to accentuate the bone structure and balance contours of the face.
Highlight: Just above the cheek bones and under the eyebrow.
Shade: Just below the cheek bones
Tip: Try to shade a line diagonally between the top of your ear and the side of your mouth. You don't want the line to go too far down the face, so stop halfway down the cheek.
A heart shaped face has a wide hairline and temples, with a smaller/narrow chin.
Our aim is to reduce the width of the forehead and widen the lower half of the face.
Highlight: On the sides of the jaw, under the eyebrow and slightly on top of the cheek bone.
Shade: On both sides of the forehead.
Tip: When shading use a light hand and try not to get it in the hair.
The characteristics of a square shaped face are a square, strong, sharp jawline and sometimes a square hairline.
Our aim is to soften angular areas of the forehead and jawlines.
Highlight: Just above the cheek bones, and below the eyebrows.
Shade: The sides of the forehead and the angles of the lower jaw.
Tip: When highlighting don't apply too much product.
A round face shape has an equal length and width, a small forehead, fully rounded jaw and full/wide cheeks.
Our aim is to reduce the width from the sides of the face and create the illusion of length down the center of the face.
Highlight: The center of the chin and under the eyebrows.
Shade: Both sides of the jaw on the lower part of the face.
Tip: When contouring try to use a light hand.
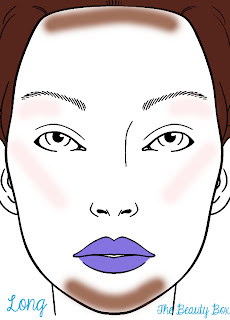
A long face is narrow and slender, with a small chin and high forehead.
Our aim is to reduce the length and add fullness and width to the face.
Highlight: Just above the cheekbones and under the eyebrows.
Shade: Along the hairline and jawline.
Tip: Remember the use little product and blend it well.
The characteristics of a diamond shaped face are a narrow forehead and chin with wide cheekbones.
Our aim is to reduce the length and widen the forehead and lower part of the face.
Highlight: Both sides of the temples, lower jaw and under the eyebrows.
Shade: The top the forehead and the chin.
Tip: When highlighting use little product and blend it outwards.
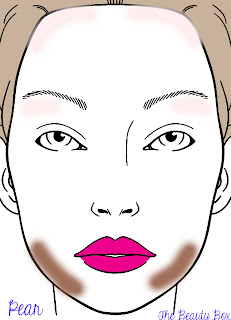
A pear shaped face has a narrow forehead with a wide/full jaw.
Our aim is to give width to the forehead and reduce the width of the lower half of the face.
Highlight: Both sides of the forehead and under the eyebrows.
Shade: The sides of the chin and angles of the lower jaw.
Tip: Remember to blend the shading underneath the chin.
Some of my favorite highlighting products are:
Nars Albatross Highlighter available here
Models prefer highlighter available here
Physicians formula mineral glow pearls available here
Favorite Shading products:
Nars the multiple available here
Nars bronzing powder in casino or laguna available here
Savvy sunkissed bronzer available here
** all photos in the post were created by me using Photoshop CS6.


Wonderful post. Thank you.
ReplyDelete